How I made a guitar amp plugin (with JUCE)
February 20, 2021A few months ago I got the itch to learn some audio programming. I decided I would learn the ropes by doing a real project - a finished product. The goal I set for myself was to build the simplest possible, decent sounding, high-gain guitar amp I could build. I’m quite pleased with the result and the amount of interesting stuff I learned while building it, so I thought I would share my findings (and code) with the world.
I used JUCE for this project. I might show some snippets here and there, but the main focus of this post will be the general audio programming thechniques and concepts I had to learn to make Ignition. If you’re interested in learning JUCE, I recommend taking a look at The Audio Programmer and the tutorials in JUCE’s website. If you use another audio development platform but are still interested in learning how to code an amp, the concepts laid out here should still apply.
I’d like to credit Joshua Hodge, Ivan Cohen and the JUCE team for being the main sources of information and inspiration for me to take this little project to completion.
Static Waveshaper
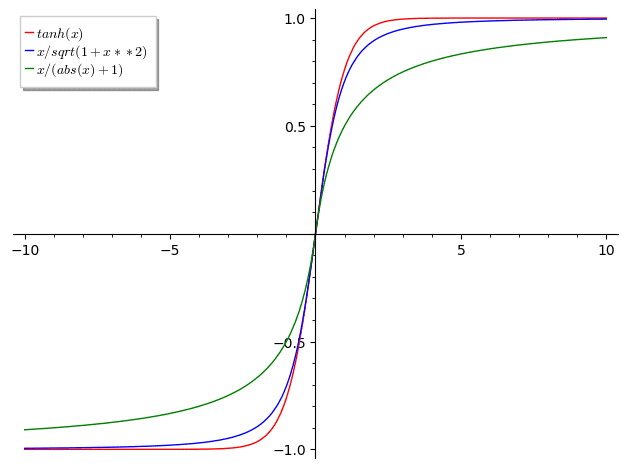
One of the main components of an amp simulator is usually a waveshaper. Luckily it’s also one of the simplest concepts to learn. A waveshaper is essentially a mathematical function that each of your samples goes through. The function’s curve is usually asymptotic at 1 and -1. Some typical waveshaper functions:
To create a distorted sound, what you do is apply a lot of gain before the waveshaper. With the appropriate waveshaper, that will softly shave off the waveform’s shape. IMPORTANT: Make sure whatever samples you output are always bounded between -1 and 1 by the time you reach the end of your processing: You don’t want to blow your eardrums - or your speakers - out!
More creative function shapes are also valid, and can create some very interesting effects but we won’t get into that. If you want to learn more about different kinds of waveshapers, this talk by Ivan Cohen is pure gold.
Since I wanted to create a distortion that sounded similar to a real guitar amp, I chose one that looks similar to the ones in the image. I found an interesting function that reacted very well to a wide range of gain values without aliasing, and that’s what I used for my main waveshaper. The waveshaper’s equation is f(x) = x / (abs(x) + 1). Some people call this an asymptotic limit waveshaper. There’s a great explanation about the virtues of this function in this video from Blue Mangoo Software.
Convolution
The simplest technique for simulating guitar cabs involves a process called convolution. I won’t get too much into the technical details - there’s people far better prepared to explain that to you out there. From a practical standpoint, you get a measurement by placing a microphone in front of your amp and use the resulting wav file to make your plugin behave like your speaker and mic combo. That wav file is called an impulse response (IR). There are hundreds of IRs available on the web for you to download, but you can make your own if you like a particular piece of hardware you have physical access to.
JUCE comes with a handy convolution module, so it’s trivial to implement this component once you have an IR that you like.
At this point I already had my distortion and cab sim set up, but my amp was still sounding horrible. I wouldn’t use this in one of my projects, so there was more work to be done.
Pre and post-emphasis
I heard about pre and post-emphasis in amp sim design in Ivan’s talk. In layman’s terms, this just means EQ’ing input before it hits your waveshaper, and in between your waveshaper and your cab simulation so that the right characteristics from your signal get crushed by the waveshaper, and the right parts of the distorted signal get sent out to your “speaker”.
Just coding away and trying different values felt like a very clumsy and slow way to get the right sound. That’s when I saw this tutorial by Blue Mangoo Software which gave me an idea: I should try to find a GUI-based open source EQ plugin built in JUCE, follow my regular mixing techniques to achieve the right sound, then take the code for the processing part and just plug in the values from the UI.
That’s exactly what I did. I found this awesome EQ plugin built in JUCE called Frequalizer. I had built my waveshaper and cab sim processors as separate plugins, so that was the perfect setup to build the following FX chain:
- Pre-emphasis Frequalizer
- Waveshaper
- Post-emphasis Frequalizer
- Cab sim
At that point I just played around with the EQs until I found the values that produced the sound I was going for. Then I put all of the processor pieces together into a single plugin and hardcoded the EQ values I had jotted down, which worked like a charm! :)
At this point I had an amp that could chug and had bite - yet somehow it was still sounding dull: It didn’t have that richness and complexity that real tube amps have. Luckily, Ivan had prevented me about how static waveshapers wouldn’t cause “non-linearities”, and would sound rather dull and he offered a solution…
Parametric waveshaper
Before we get to the actual solution to the dullness of the amp, we have to understand another simple concept that builds upon the static waveshaper we’ve already used before: The parametric waveshaper. This is just a waveshaper with a variable that modifies it’s shape, which could for example be tied to a knob in your interface. In order to make sure the parameter didn’t make my waveshaper go haywire (for example by outputting samples outside the [-1, 1] range) I used a math program to plot my candidate parametric waveshapers and find a range of values that the parameter could take and still produce valid waveshaping functions.
After some experimentation, I decided to use this equation: f(x, parameter) = (x * (abs(x) + parameter) / (x * x + (parameter - 1) * abs(x) + 1)) * 0.7.
No commercial amplifier that I know comes with a “waveshaper parameter” knob, and much less have I ever seen a roadie vigorously turning a knob back and forth mid-performance. If you’ve ever used a modular synth, you probably know where I’m going with this…
Waveshaper parameter modulation
We’ve added a parameter that can change over time. Now we need that parameter to oscilate within a range of valid values as the time goes on. Ivan’s trick to make the amp sound more complex and dynamic is to use the output of an envelope follower to modulate the waveshaper’s parameter.
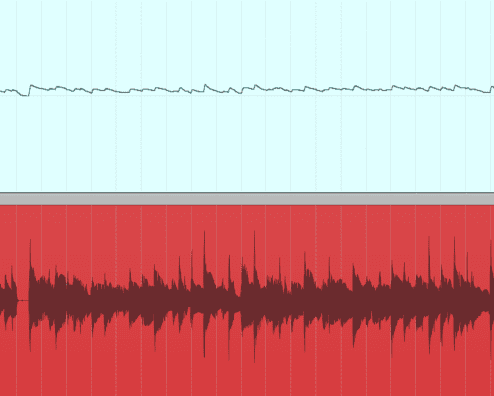
So what’s an envelope follower you say? It’s the combination of a full-wave rectifier and a slew limiter. Huh? Yeah, I don’t really know what that means, but I know it’s a DSP component that “follows” the shape of your waveform, kind of like this (enveloper follower output on top, guitar input at the bottom):
Writing an envelope follower by myself proved quite challenging but luckily I found some classes that implemented one in Robin Schmidt’s Music Engineering Tools.
Once I had an implementation, I needed to plug it in and find the right values for the attack and release. I first started by using the envelope follower as a standalone plugin and rendering out the output for a guitar loop I used as input. At first, I was getting some wacky-looking results, but after some trial and error I started getting a proper following of my waveform.
Putting all the pieces together was surprisingly simple but very satisfying. For each block of input samples, I calculated the corresponding “envelope followed” samples. I then modified my parametric waveshaper so its process method took not one but two blocks of samples: a) The input signal it was supposed to distort (the audio block any processor takes); and b) The results of running the envelope follower over those very samples (aka the sidechain). When processing, the waveshaper parameter for each sample position i is the value in the sidechain buffer for that same position.
Finally, I fine-tuned the attack and release envelope follower values by attaching them to temporary knobs in my UI and playing around until they sounded good to me.
I think that this addition is what made the amp come to life. At this point I was really happy with the amp. Although in order to call it an amp it needed some EQ controls. Guitarrists are known to expect that.
Tone control
With the pre and post-emphasis code at hand, adding a band to the high mids was somewhat trivial. I added a tone knob and associated it to the gain of that peak EQ filter so that it could boost and cut some of the most interesting frequencies. That makes it so that with just one tone control dial you can go from scooped-mids modern metal sounds to bright pop-punk.
At this point I cranked the volume up and tried the amp out to see how it felt. It could chug; it could produce sparkly, rich open chords; it could squeal. Putting my guitar in front of my speakers produced authentic feedback. I was able to get a few different usable tones out of it. I had created a real amp.
Final words
This project has taught me all I know about audio programming. If this information has been useful to you as well, please download Ignition for free from my home page (scroll down to plugins). That way you can give me feedback on Ignition and get notified about new posts, products and services. You can also follow THM on Instagram, Twitter and Facebook.
The Ignition code is available on github. It is free and open source.

